- My MacBook came from the factory with an 80 GB drive (Fujitsu MHV2080BHPL), and I decided to take the plunge and upgrade to a larger drive
Sylvia is going from 120GB to 500GB. This is a WD Scorpio Blue 5400RPM
- 1) I backed up my existing hard drive to an external firewire enclosure using SuperDuper.
Sylvia is already doing this, so we brought her backup up-to-date, which took under 10 minutes.
- 2) I shut down and rebooted, holding the "Option" key to see my boot device choices: I chose the external drive and booted from that, just to make sure everything on the backup worked okay.
OK, let's see... power on, hold down option key for a ... long ... time. OK, got a choice of boot devices, point at the external drive and double click.
Somebody asked how long it took; the (digital) clock on the range said 2:40 when I selected it; now it says 2:41 (hint: the sun is shining) and her desktop has the just-added SuperDuper! icon. Desktop background is the starfield one though, rather than Sylvia's usual background—a painting of a mountain scene.
- It did. I shut down the MacBook and disconnected the external drive.
3) I laid out a clean cloth, turned the MacBook over and removed the battery. Then I used a small (jeweler's) Phillips-head screwdriver to loosen the three screws on the memory/hard drive bracket in the battery compartment. Then I removed the bracket.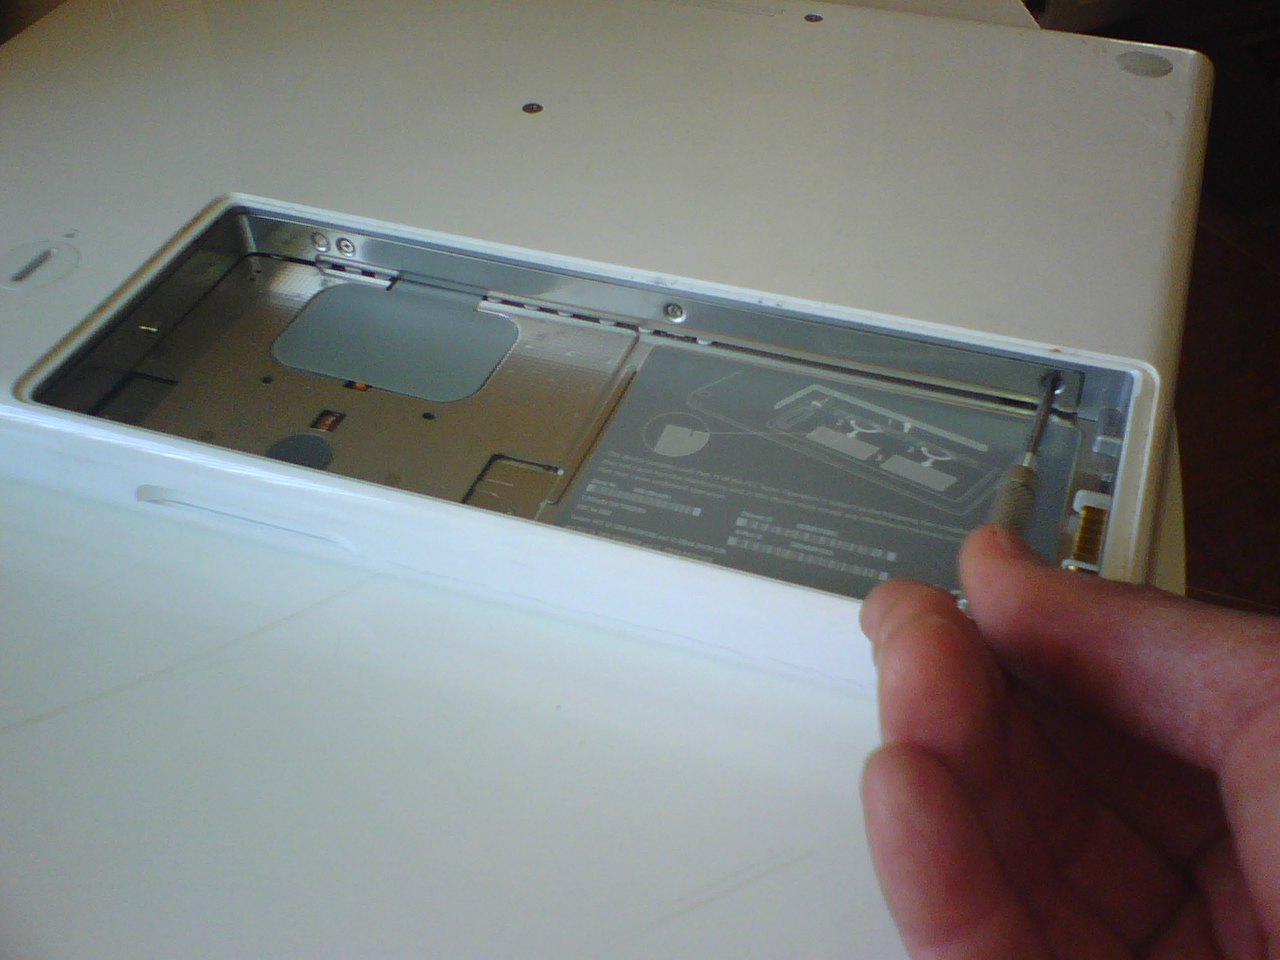
shutdown... check; disconnect hard drive... check. disconnect power... check. remove battery... check. three screws... check. bracket... check.
- 4) The hard drive is in the left end of the case inside the battery compartment. I untucked the plastic tab and gently pulled: the hard drive slipped right out.
untuck tab... check. pull gently... hard drive slipped right out. Yessss!
-
5) The hard drive is mounted on a thin metal caddy: you will need a #9 Torx screwdriver to remove the drive from the caddy. I removed the four screws from the caddy and removed it from the old hard drive. Then I put the caddy on the new drive.
Some other website said you needed a #8 torx; I went to Ace Hardware and got their 6-piece set that had ['T'+`x` for x in range(5,11)] (pardon my Python). The T9 fits better, but T8 didn't slip.
-
6) I slid the new drive into its slot and tucked the plastic tab underneath the drive as the old one originally was.
Piece of cake. By the way, I put the old drive into the antistatic bag that the new drive came in.
-
7) I replaced the memory/hard drive bracket and battery, and put the unit upright again.
Ditto. Done.
-
8) I connected the firewire drive and powered up the MacBook holding the Option key. I selected the external drive (as I did in Step 2) and booted up.
Man, that's easier than I thought! Less than 40 minutes spent so far, and that includes taking the photo you see above and updating this posting.
-
9) Once running, the MacBook gave an error message that I connected an "invalid device." A dialog box asked if I wanted to initialize the disk, and when I clicked "yes" it brought up Disk Utility.
Or... "The disk you inserted was not readable by this computer." I clicked the "Initialize" button and Disk Utility came up.
-
10) In Disk Utility, I selected the new drive and chose "Erase." After a minute the drive was ready and MacOS mounted it: I could see it on my desktop and in the Finder.
I selected "640.14 WDC WD640..." Apparently the "500 GB" disk is 640GB. (There's an insert in the box -- 140GB free!) I selected "erase" with defaults (journaled FS, but I didn't say "case sensitive").
-
11)
I fired up SuperDuper again, this time making the external drive the source and the new internal drive the target. The restore took about an hour.This didn't work! SuperDuper didn't let me select the new HD as the destination. I googled on "superduper help" (no quotes), which eventually led me to http://homepage.mac.com/dnanian/SuperDuper/SuperDuper.pdf from which I learned that the hot thing to do is select Disk Utility's "Restore" tab. Took about 20 minutes to figure that out (I'm slow).
Speaking of Slow, Disk Utility estimates 4 hours to restore. (10 minutes later, it says "2 hours.")
One more thing! Since the firewire ext drive was called "lacie ext drive" and it's getting restored to the WD internal drive, all aspects of the drive are getting copied; it now appears that "lacie ext drive" is getting copied to "lacie ext drive". Spooky, but it's OK. I hope.
We're now looking at a 6pm completion time. I'll put the rest of carabiner23's November 2006 post (shoulda looked at the date) into a different color...
-
12) Once completed, I shut down the MacBook, disconnected the firewire drive, and pushed the Power button. The MacBook booted perfectly with the new drive. Success!
- 13) Once I was up and running, I ran a "Repair Permissions" just to make sure everything was copacetic. It's all good.
Saturday, June 11, 2011
macbook hard drive upgrade
My buddy Sylvia wanted a hand upgrading the HDD on her macbook. Having not
ever done this before I was interested to see what it was like. Google pointed
me at a bunch o' pages and I decided to emulate http://www.mac-forums.com/forums/apple-notebooks/45292-another-macbook-hard-drive-replacement-experience.html:
Subscribe to:
Post Comments (Atom)


No comments:
Post a Comment